

Building Your First AI Agent (That Will Actually Improve You As An AI Engineer)
A guide to building a helpful Multi-agent AI system that helps you find the best AI research papers published in ArXiv every day


It’s great to have an in-depth understanding of Agentic AI as an engineer today, and this lesson is all about that.
Let’s begin our journey learning the basics.
Is An Agent Just an LLM?
Many people don’t get this right.
An LLM is a language model that can understand and generate human-like text. It can answer questions, write stories, and help with language translation.
On the other hand, an AI agent is more like a robot that can perform tasks independently.
It has “agency”.
An AI agent can:
Perform actions and take feedback from its environment
Think through to improve its actions based on the feedback
Work towards completing a goal rather than waiting for it to be further prompted (unless specified to do so)
Work in collaboration with other agents
An agent can be built on top of a large language model (LLM) or other neural networks, and it may use reinforcement learning (RL) or rule-based systems, and so on.
The Basics Of Our Agentic Framework
We start building our AI agents using CrewAI.
It is an open-source Python framework that helps us build AI systems using single or multiple agents that can work together to solve complex tasks.
You might have seen many LangChain tutorials on building agents, but we use CrewAI in this tutorial because LangChain has a peculiar syntax that can get tough to interpret pretty soon.
CrewAI is much simpler to use, is rapidly growing, has an active and helpful community, and has an amazing documentation (surprisingly written by agents built on top of CrewAI).
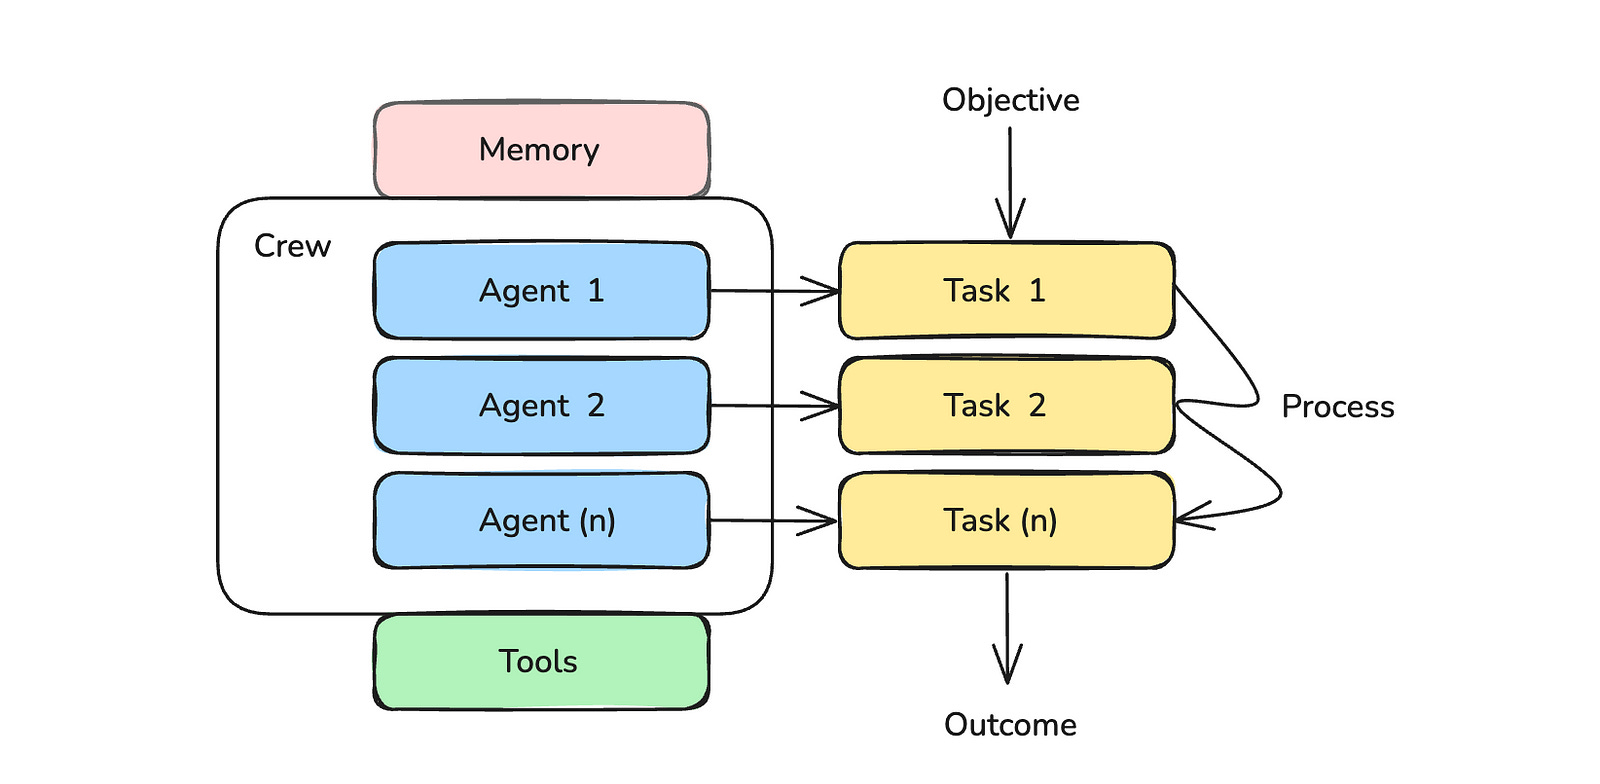
To start with, we need to understand the following six terms:
Crew
This is the top-level organization that manages AI agents and helps them collaborate to produce the intended output.
2. Agents
These are LLM-based autonomous entities with specific roles. They can make autonomous decisions, use tools, and work with other agents to solve problems.
3. Tasks
These are the sub-objectives that AI agents work on.
4. Tools
These are components that enable agents to perform a wide range of tasks, such as web search, web scraping, file management, and more.
5. Memory
This is a system that lets AI agents remember their short-term and long-term past interactions to improve their problem-solving skills.
6. Process
This is the workflow management system that defines how agents will interact and collaborate to work efficiently.
These 6 CrewAI components come together to achieve a given objective/ goal.
By the way, have you heard about 'AI in 100 Images'? It's a book that uses 100 visuals to explore the fascinating world of Artificial Intelligence, and it's available for free.

Building Our First Multi-Agent System — ArXiv Research Crew
This tutorial is based on the philosophy of learning by doing.
By the end of it, you will have a multi-agent system that will work to fulfil the following Objective:
Search ArXiv for all the AI research papers on a given date
Rank the top 10 most important papers out of them
Return the results in a well-formatted HTML file
Ask for our feedback in between its steps so that its functioning can be well-monitored and tweaked whenever needed
We write all of our code in a Google Colaboratory notebook, but you are encouraged to run it locally if you prefer this.
Step 1: Install the packages
!pip install crewai crewai_tools arxivStep 2: Step up Environment Variables
Create an OpenAI API key and set it as an environment variable as follows.
CrewAI, by default uses gpt-4o-mini to build agents. I’ve shown this explicitly in the code below, and you can work with smaller/ cheaper/ more powerful models than it if you prefer.
# Set up environment variables
import os

openai_api_key = "YOUR_API_KEY"

os.environ["OPENAI_API_KEY"] = openai_api_key
os.environ["OPENAI_MODEL_NAME"] = "gpt-4o-mini"
Step 3: Building a custom ArXiv Search Tool
CrewAI comes with multiple tools that you can use out of the box.
These can be easily imported and used from the crewai_tools package we installed previously, as shown below.
# Importing crewAI tools
from crewai_tools import (
    DirectoryReadTool,
    FileReadTool,
    SerperDevTool,
    WebsiteSearchTool
)

# Set up API keys for Serper
os.environ["SERPER_API_KEY"] = "Your Key" # serper.dev API key

# Instantiate tools
docs_tool = DirectoryReadTool(directory='./your-directory') # Tool for reading documents from a specified directory
file_tool = FileReadTool() # Tool for reading individual files
search_tool = SerperDevTool() # Tool for performing web searches using the Serper API
web_rag_tool = WebsiteSearchTool() # Tool for searching and extracting information from websites
You can also integrate and use tools from LangChain with CrewAI easily.
For our use case, we will build a custom tool that our AI agent can use to search a particular category in ArXiv and retrieve all the results for a given date.
To create a custom tool, we need to inherit from the BaseTool class and define the necessary attributes, including the args_schema for input validation and the _run method.
Pydantic is used to define the input schema for our tool.
from typing import Type, List
from pydantic import BaseModel, Field
from crewai.tools import BaseTool

import arxiv
import time
import datetime

class FetchArxivPapersInput(BaseModel):
    """Input schema for FetchArxivPapersTool."""
    target_date: datetime.date = Field(..., description="Target date to fetch papers for.")

class FetchArxivPapersTool(BaseTool):
    name: str = "fetch_arxiv_papers"
    description: str = "Fetches all ArXiv papers from selected categories submitted on the target date."
    args_schema: Type[BaseModel] = FetchArxivPapersInput

    def _run(self, target_date: datetime.date) -> List[dict]:
        # List of AI-related categories.
        # You can also include ["cs.AI", "cs.LG", "cs.CV", "cs.MA", "cs.RO"]
        AI_CATEGORIES = ["cs.CL"]

        # Define the date range for the target date
        start_date = target_date.strftime('%Y%m%d%H%M')
        end_date = (target_date + datetime.timedelta(days=1)).strftime('%Y%m%d%H%M')

        # Initialize the ArXiv client
        client = arxiv.Client(
            page_size=100,  # Fetch 100 results per page
            delay_seconds=3  # Delay between requests to respect rate limits
        )

        all_papers = []

        for category in AI_CATEGORIES:
            print(f"Fetching papers for category: {category}")

            search_query = f"cat:{category} AND submittedDate:[{start_date} TO {end_date}]"

            search = arxiv.Search(
                query=search_query,
                sort_by=arxiv.SortCriterion.SubmittedDate,
                max_results=None  # Fetch all results
            )

            # Collect results for the category
            category_papers = []
            for result in client.results(search):
                category_papers.append({
                    'title': result.title,
                    'authors': [author.name for author in result.authors],
                    'summary': result.summary,
                    'published': result.published,
                    'url': result.entry_id
                })

                # Delay between requests to respect rate limits
                time.sleep(3)

            print(f"Fetched {len(category_papers)} papers from {category}")
            all_papers.extend(category_papers)

        return all_papers
We initialize this tool as follows:
arxiv_search_tool = FetchArxivPapersTool()Step 4: Creating Agents
Agents work better when they are asked to play a role.
Based on this fact, each Agent is initialized with a:
Role
Goal
Backstory
We define two agents to work on our objective:
ArXiv Researcher
# Agent 1: ArXiv Researcher

researcher = Agent(
    role = "Senior Researcher",
    goal = "Find the top 10 papers from the search results from ArXiv on {date}."
            "Rank them appropirately.",
    backstory = "You are a senior researcher with a deep understanding of all topics in AI and AI research."
                "You are able to identify the best research papers based on the title and abstract.",
    verbose = True,
    tools = [arxiv_search_tool],
)
The parameter verbose is set to True to see detailed logging about the agent’s execution.
The parameter tools specifies what tools an AI agent can use during its execution.
2. Frontend Engineer
# Agent 2: Frontend Engineer

frontend_engineer = Agent(
    role = "Senior Frontend & AI Engineer",
    goal = "Compile the results into a HTML file.",
    backstory = "You are a competent frontend engineer writing HTML and CSS with decades of experience."
                "You have also been working with AI for decades and understand it well.",
    verbose = True,
)
The Agent class also comes with an optional parameter llm that lets you choose different LLMs for different agents if you wish to do so.
Step 5: Creating Tasks
You must have thought why we don’t use a single LLM as an agent and give it all the tools that it needs to complete an objective.
The reason is that breaking down an objective into sub-objectives or Tasks and letting each AI agent work on a Task leads to better results.
Each Task is specified with a description and an expected_output.
The parameter agent tells what agent must be used for a given task.
We break down our objective into two tasks as follows:
Research Task for ‘ArXiv Researcher’ agent
# Task for ArXiv Researcher

research_task = Task(
    description = (" Find the top 10 research papers from the search results from ArXiv on {date}."),
    expected_output = (
        "A list of top 10 research papers with the following information in the following format:"
        "- Title"
        "- Authors"
        "- Abstract"
        "- Link to the paper"
    ),
    agent = researcher,
    human_input = True,
)
The parameter human_input is set to True to ensure that the agent takes our feedback on its result after working on a task.
2. Reporting Task for ‘Frontend Engineer’ agent
# Task for Frontend Engineer

reporting_task = Task(
    description = ("Compile the results into a detailed report in a HTML file."),
    expected_output = (
        "An HTML file with the results in the following format:"
        "Top 10 AI Research Papers published on {date}"
        "- Title (which on clicking opens the paper in a new tab)"
        "- Authors"
        "- Short summary of the abstract (2-4 sentences)"
    ),
    agent = frontend_engineer,
    context = [research_task],
    output_file = "./ai_research_report.html",
    human_input = True,
)
The parameter context ensures that this task relies on the output of the research_task and uses it as context.
The parameter output_file tells where the task result must be saved (name and location of the output file).
Step 6: Creating the Crew
In this step, we create a Crew using the agents and the tasks that we initialized.
arxiv_research_crew = Crew(
    agents = [researcher, frontend_engineer],
    tasks = [research_task, reporting_task],
    verbose = True,
)
Note that Crew has an optional parameter called Process with the default value sequential.
This makes sure that each agent runs one after the other.
But we could set its value to hierarchical and define another agent that acts as a manager to supervise and allocate tasks to other agents based on their capabilities, review outputs, and assess task completion.
Here’s what our Crew looks like overall:
Step 7: Running the Crew & giving it feedback on its results
Did you notice that we used the placeholder date when we defined agents and tasks?
We can pass the value of this placeholder when we run the crew using the kickoff method as follows.
crew_inputs = {
    "date" : "2025-03-12"
}

result = arxiv_research_crew.kickoff(inputs = crew_inputs)
And there we go!
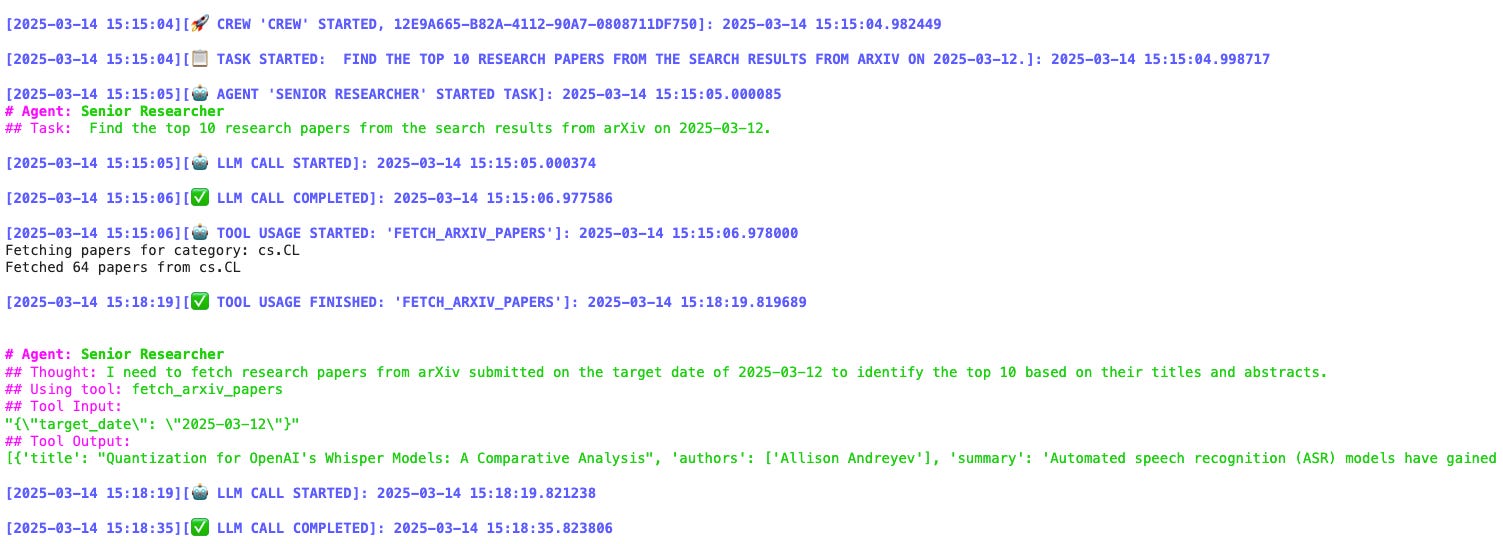
We can see the thought process of our first agent and how it uses our tool to search for research papers on ArXiv.
It then returns the top 10 research papers from the results.
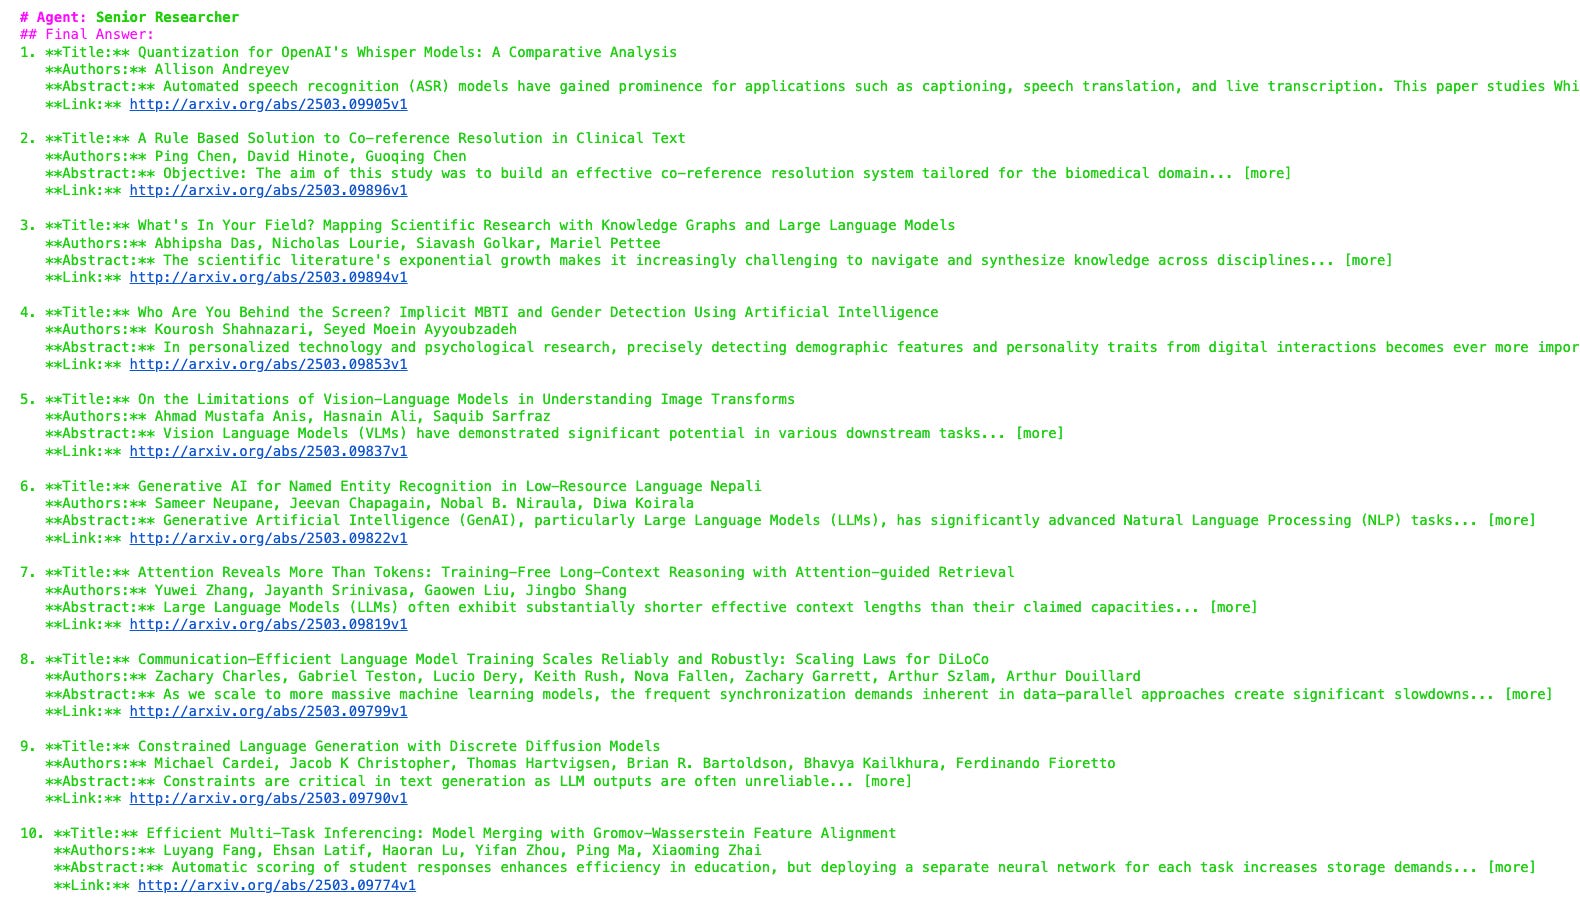
Upon returning its response, it asks us for feedback on it.
(The yellow colour of the text might be tough to read on a white background.)
Upon receiving positive feedback, the execution of the next agent begins.

This agent returns the following response (shown truncated in the image).

It then asks for our feedback again.

I noticed that the agent inserts unnecessary tags at the end of its output, so I gave it feedback to remove them.
(We can even add this to the Reporting Task’s expected_output parameter to fix this behaviour.)
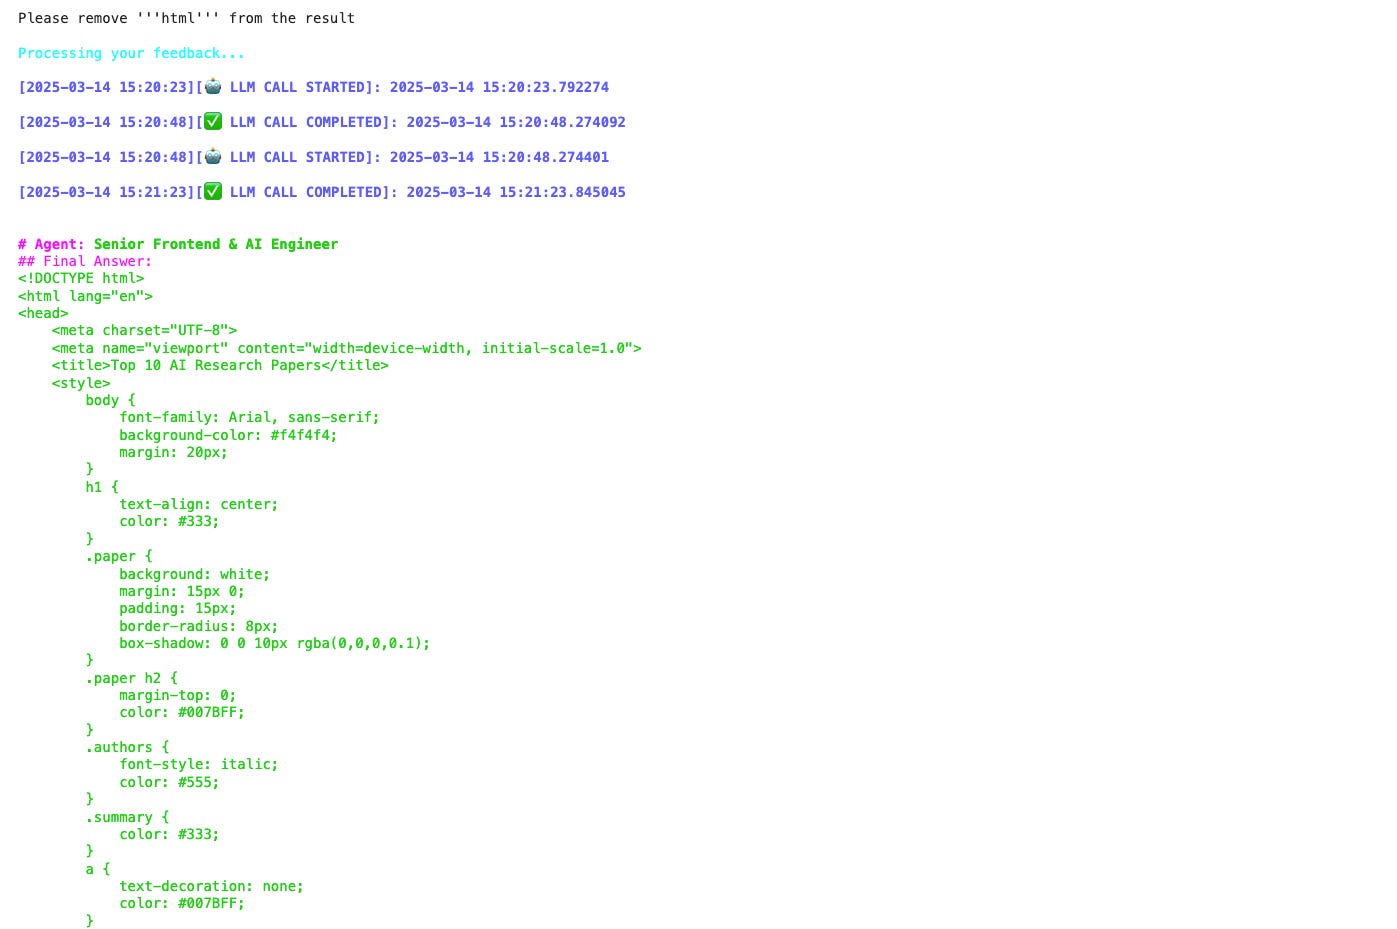
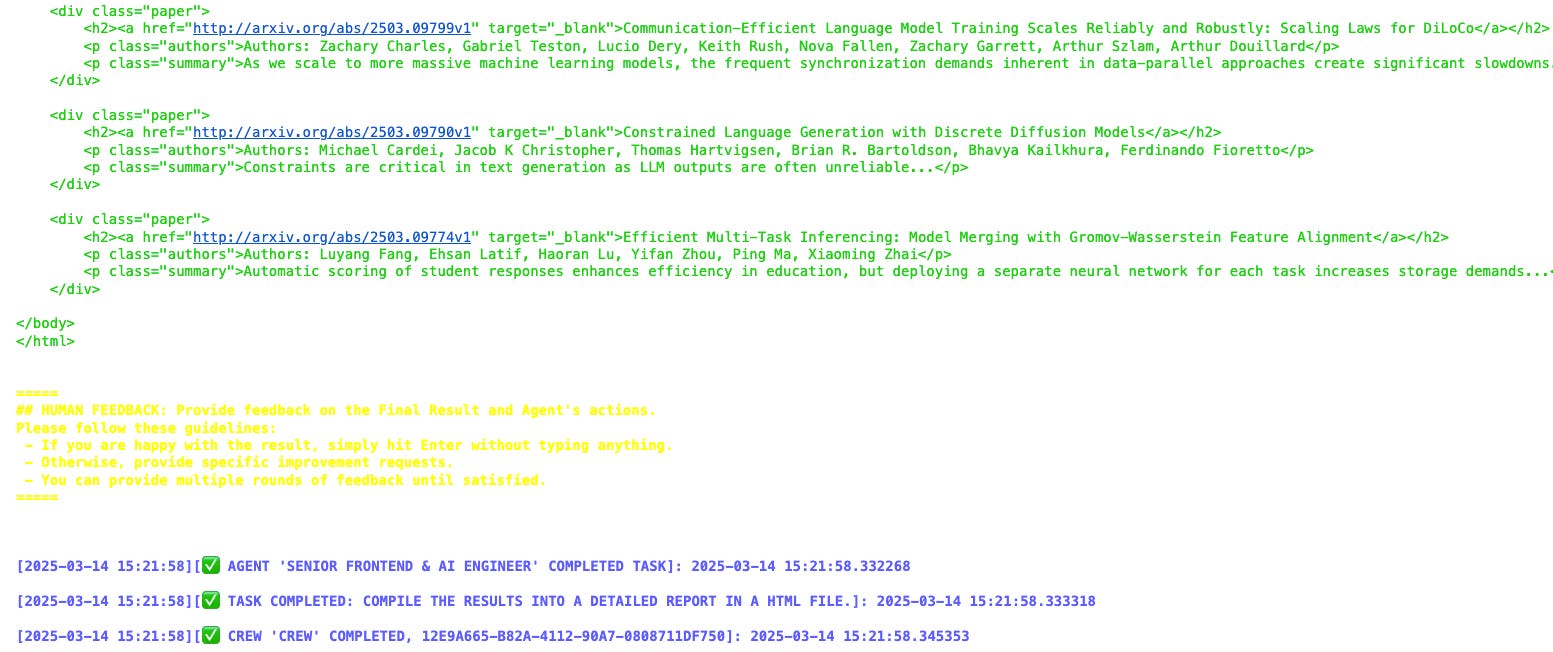
The agent successfully processes the feedback and removes these tags, returning its final response and asking for feedback.
On approval, the output is saved in an HTML file as intended.
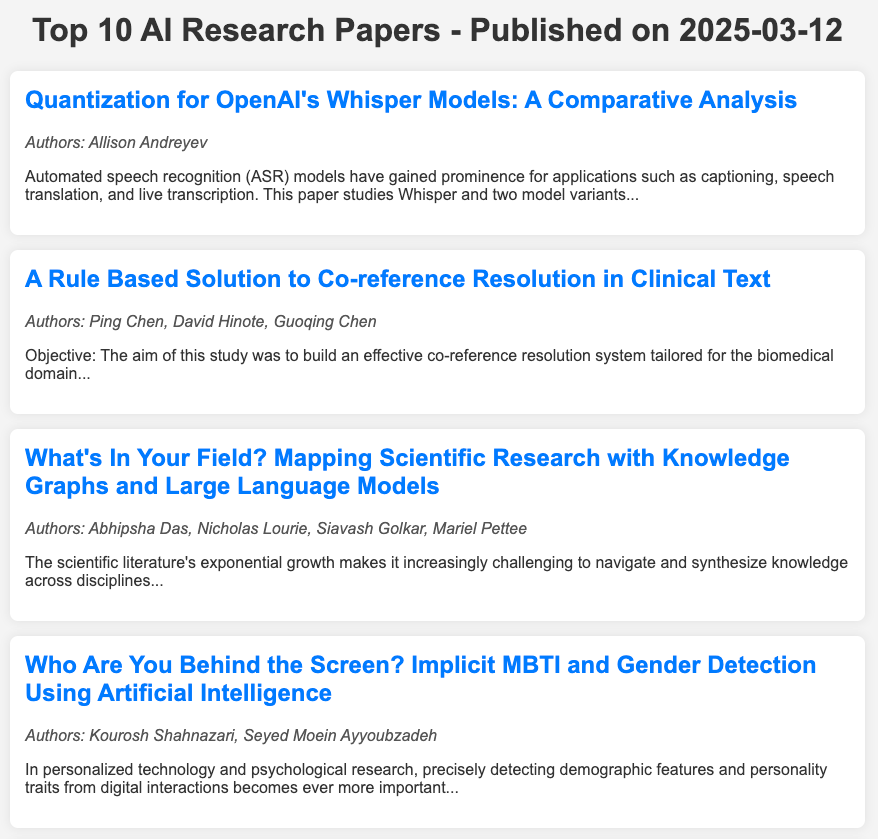
Here’s what that file looks like for the results from 2025–03–12.
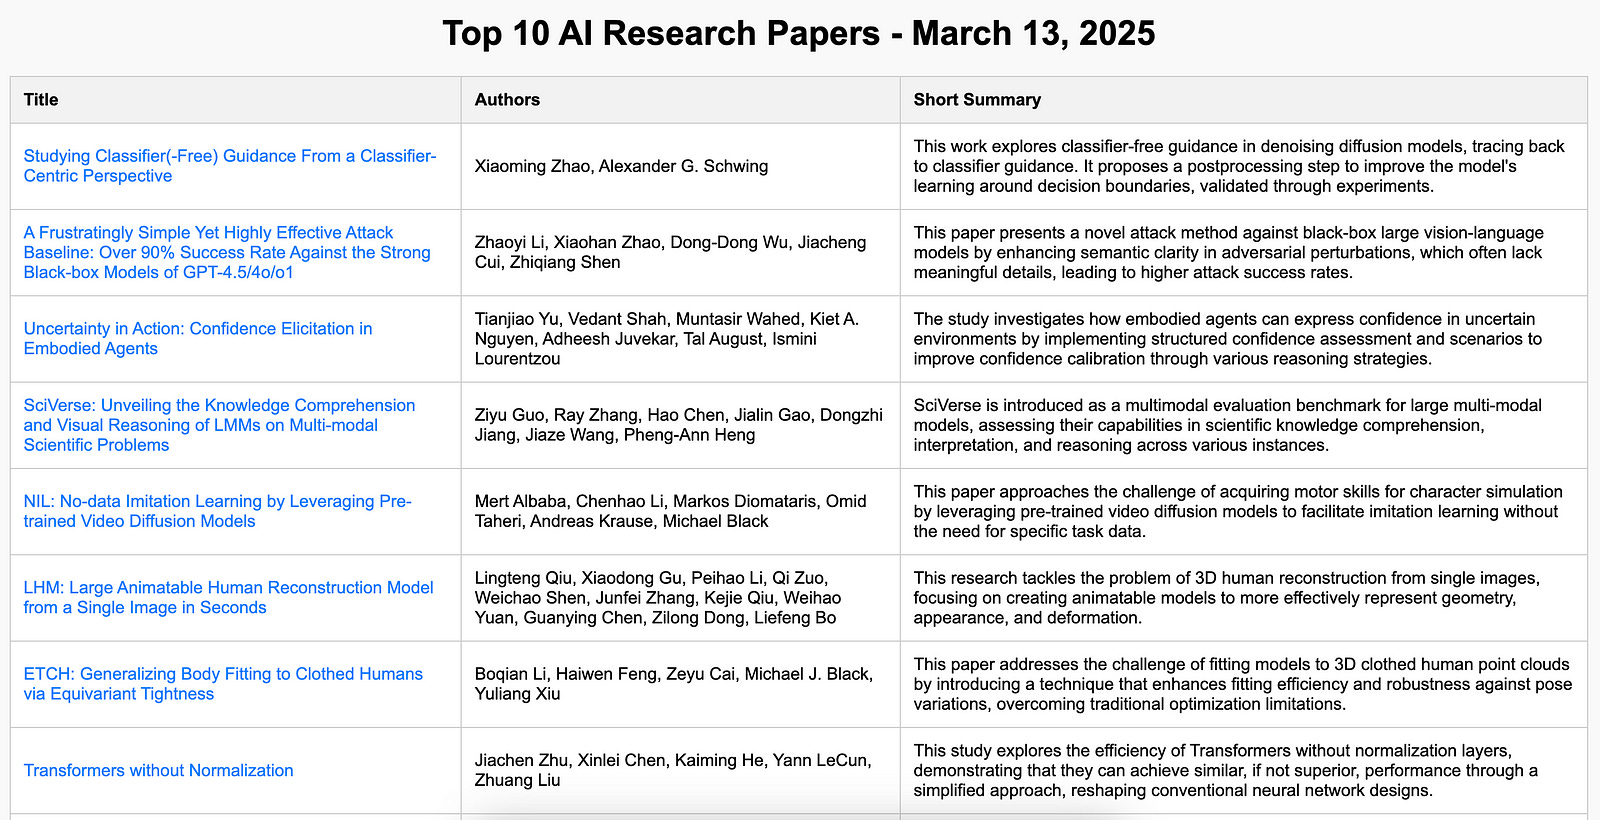
The results from the next day from the topic ‘cs.AI’ look like the following:
Congratulations on building your first multi-agent system that you can now use to stay updated with state-of-the-art AI research and improve yourself as an engineer!
Step 8: Improving the Crew
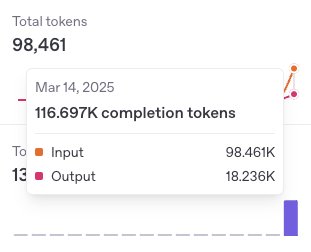
You should be aware that using LLM as an agent can be expensive due to the number of tokens used in the process.
The following image shows the number of tokens used to run this agent just a few times.
Here are a few tips on how this multi-agentic system can be improved:
An open-source model can be used with Ollama instead of GPT-4o-mini to save on expenses.
A hierarchical crew can be built where different agents search for different ArXiv publication categories.
Search and retrieval tools can be improved to fetch the most relevant data fields from research papers to save on LLM tokens.
The output file’s layout can be standardized, and so on.
Further Reading
Google Colab Notebook containing the code used in the tutorial
Multi AI Agent Systems with CrewAI course on DeepLearning.AI
Source Of Images
All images used in the article are created by the author unless specified.

Very easy to follow tutorial
How does crew agent compare to open manus? also thank you very much for all your hard work thus far.