
Building A LinkedIn Content Creation Agency Using Google’s Agent Development Kit
A hands-on tutorial on creating a helpful multi-agent AI system using Google’s ADK with Sequential and Parallel agents monitored by Guardrails, combining tools from LangChain and CrewAI

Google recently introduced its Agent Development Kit (ADK), which is an easy-to-use modular framework for developing, evaluating and deploying AI agents.
Here’s a lesson in which we will use this framework to build a multi-agent system that can research a given topic and return an SEO-optimized LinkedIn post on it, together with a creative visual to post alongside.
This tutorial is based on the philosophy of learning by doing. Therefore, I will skip the theory behind how AI agents work and jump straight to coding.
By the end of it, you will have a LinkedIn content creation multi-agent system that will do the following:
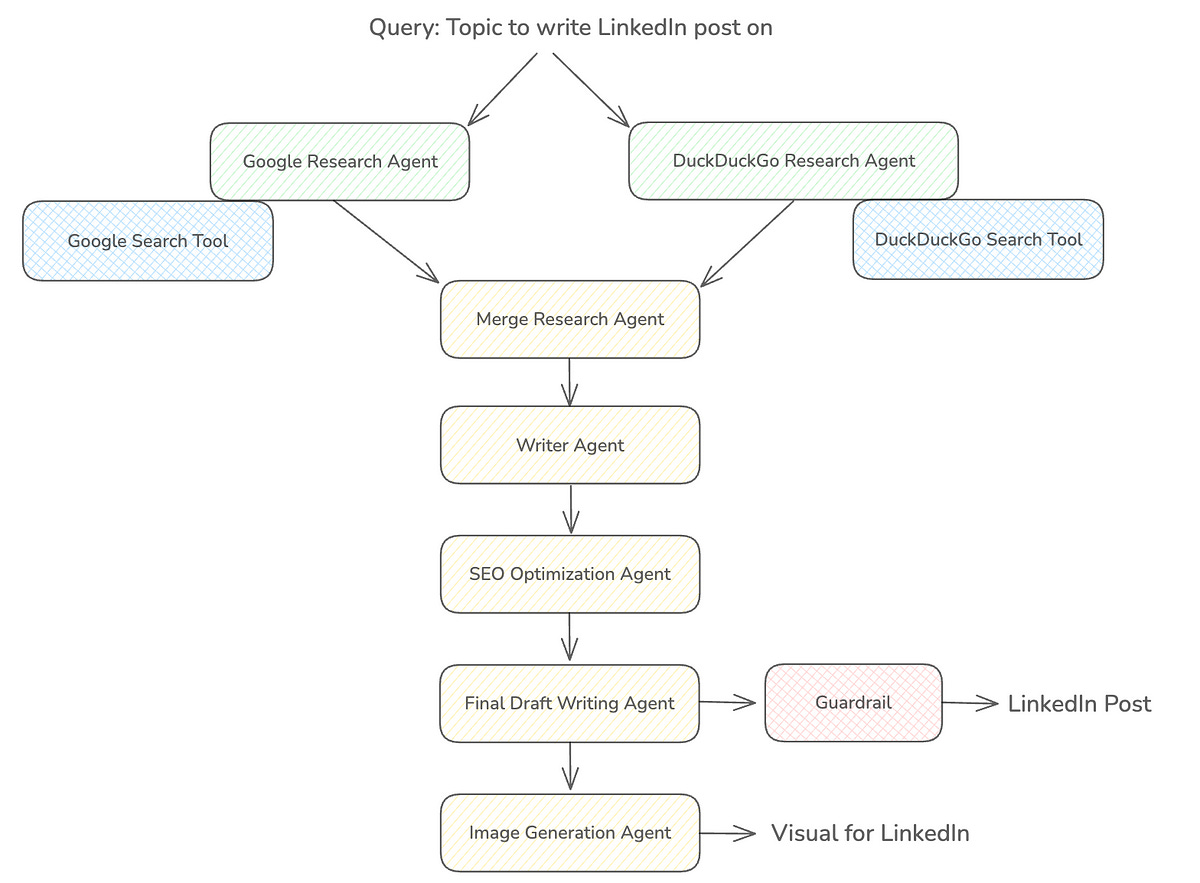
Two agents will search for content about a given topic on Google (using an in-built tool) and DuckDuckGo (a tool from Langchain) in parallel
Their results will be refined and combined by another AI agent
A writer agent will use these results to write a LinkedIn post (with a hook, key insights and a clear call-to-action)
An SEO optimization agent will improve this write-up for the best reach
A draft writing agent will further refine the post for inconsistencies and as per our preferences, using customised Guardrails
An image creation agent will finally understand the context of the post and create an engaging visual to be posted alongside on LinkedIn using a tool from CrewAI
This is what our multi-agent system will look like.
This lesson will give us hands-on experience working with:
LLM agents
Workflow agents (Sequential and Parallel) and combine them
Built-in tools
Tools from Langchain & CrewAI
Guardrails
Session
All of the code is written in a Google Colab notebook in Python to make it easy to follow for everyone.
Let’s begin!
By the way, have you heard about ‘Computer Science in 100 Images’? It’s a book that uses 100 engaging visuals to explore and explain fundamental concepts in Computer Science.
Grab your copy here (at a special 40% discount for Medium readers).

Install Packages
We begin by installing the Google ADK package using uv as follows:
!uv pip install google-adk --prerelease=allowSet Up Google API Key
A Google Gemini API key can be obtained easily from Google AI Studio, which has a generous free tier sufficient for this tutorial.
This API key can be directly imported if you’re using the same account in Google Colab that you used to create the API key.
If not, it can be manually added to the Colab notebook as shown below.

We can use this API key in our notebook as follows:
# Set Google AI Studio API key
import os
from google.colab import userdata

os.environ["GOOGLE_API_KEY"] = userdata.get("GOOGLE_API_KEY")
Create A Google Research Agent
Let’s write up our first agent called Google_Research_Agent that uses the Gemini 2.0 Flash model and the Google Search tool (a built-in tool with ADK) to research on a given topic.
ADK uses the LLMAgent class to set up LLM-based agents.
(Note that I will be using Gemini 2.0 Flash for all of our agents, but you can choose other LLMs if you wish to do so.)
GEMINI_MODEL = "gemini-2.0-flash"from google.adk.agents.llm_agent import LlmAgent
from google.adk.tools import google_search
# Google Research Agent
google_research_agent = LlmAgent(
name = "Google_Research_Agent",
model = GEMINI_MODEL,
instruction = """
You are a Research AI agent.
Use Google search to find recent and relevant information on the provided topic.
Do not add information on your own apart from what you found after the Google search.
Summarize key points, statistics, and insights in bullet points.
""",
description = "Researches on a given topic using Google Search.",
tools = [google_search],
output_key = "google_research_summary"
)Create A DuckDuckGo Research Agent
This agent will use Langchain's DuckDuckGo search tool. Let’s set this up.
!uv pip install -qU duckduckgo-search langchain-community --prerelease=allowADK makes it easy to use these LangChain tools with its LangchainTool class.
# Set up Duckduckgo search tool from Langchain

from google.adk.tools.langchain_tool import LangchainTool
from langchain_community.tools import DuckDuckGoSearchRun

# Instantiate the tool
duckduckgo_tool_instance = DuckDuckGoSearchRun(
    max_results = 5,
)

# Wrap the tool in the LangchainTool class from ADK
adk_duckduckgo_tool = LangchainTool(
    tool=duckduckgo_tool_instance,
)
Finally, we set up an LLMAgent to use this tool as follows:
# DuckDuckGo Research Agent
duckduckgo_research_agent = LlmAgent(
    name = "DuckDuckGo_Research_Agent",
    model = GEMINI_MODEL,
    instruction = """
    You are a Research AI agent.
    Use DuckDuckGo search to find recent and relevant information on the provided topic.
    Do not add information on your own apart from what you found after the DuckDuckGo search.
    Summarize key points, statistics, and insights in bullet points.
    """,
    description = "Researches on a given topic using DuckDuckGo Search.",
    tools = [adk_duckduckgo_tool],
    output_key = "duckduckgo_research_summary"
)
Create A Parallel Workflow Agent
Workflow agents in ADK are different from LLM Agents.
They are specialized agents that control the execution flow of their sub-agents. Their results are deterministic and based on predefined logic rather than an LLM.
ADK gives us options to use three types of Workflow agents:
Sequential Agents: that execute sub-agents in a sequence.
Loop Agents: that repeatedly execute their sub-agents until a specific termination condition is met.
Parallel Agents: that execute multiple sub-agents in parallel.
Since we want the Google_Research_Agent and DuckDuckGo_Research_Agent to work in parallel, we will use a Parallel Workflow agent to orchestrate them.
This is done as follows:
from google.adk.agents.parallel_agent import ParallelAgent

# Parallel Web Research Agent
parallel_web_research_agent = ParallelAgent(
    name="Parallel_Web_Research_Agent",
    sub_agents=[google_research_agent, duckduckgo_research_agent]
)
Create An Agent To Merge Research Results
To combine the results from the previous agents in a clear and concise way, use another LLMAgent defined as follows:
# Merge Research Agent (combine Google and DuckDuckGo results)
merge_research_agent = LlmAgent(
    name = "Merge_Research_Agent",
    model = GEMINI_MODEL,
    instruction = """
    You are a Content Merging AI.
    Merge the outputs provided by the Google and DuckDuckGo agents in the session state under the keys 'google_research_summary' and 'duckduckgo_research_summary', respectively.
    Do not add information on your own.
    Remove duplicates.
    Summarize key points clearly in bullet points.
    """,
    description = "Merges research results from Google and DuckDuckGo.",
    output_key = "merged_research_summary"
)
Creating A LinkedIn Post Writing Agent
To write up a LinkedIn post from the search results, we define a Writer_Agent as follows:
# Writer Agent
writer_agent = LlmAgent(
    name = "Writer_Agent",
    model = GEMINI_MODEL,
    instruction = """
    You are a LinkedIn Content Writer AI.
    Based on the research summary provided in session state with the key 'merged_research_summary', draft a LinkedIn post that includes:
    - A compelling hook and heading
    - Key insights (describing the topic in technical detail if available)
    - A clear call-to-action

    Ensure the tone is professional and engaging.
    Do not add links to any external resources.
    Do not add your own information and your writing should be totally based on the research summary.
    """,
    description = "Drafts initial LinkedIn post based on research results.",
    output_key = "initial_draft"
)
Create The SEO Optimizer Agent
To get the best SEO for our post, we will use a SEO_Optimizer_Agent set up as follows:
# SEO Optimizer Agent
seo_optimizer_agent = LlmAgent(
    name = "SEO_Optimizer_Agent",
    model = GEMINI_MODEL,
    instruction = """
    You are an SEO Optimizer AI.
    Enhance the draft provided in session state with the key 'initial_draft' by:
    - Incorporating relevant keywords
    - Adding appropriate hashtags (**only** 3)
    - Ensuring optimal length (not omiting relevant research details) and readability
    - Formatting for LinkedIn best practices
    """,
    description="Optimizes content for SEO and LinkedIn formatting.",
    output_key="seo_optimized_draft"
)
Create The Final Draft Writing Agent
Using the SEO optimizer draft, we will use another agent to draft the final post for us.
final_draft_writing_agent = LlmAgent(
    name = "Final_Draft_Writing_Agent",
    model = GEMINI_MODEL,
    instruction = """
    You are a LinkedIn Post Drafting AI.
    Review the optimized content provided in the session state with the key 'seo_optimized_draft' for:
    - Clarity and coherence
    - Grammatical accuracy
    - Consistent tone and style
    - Engagement and professionalism

    Remove Markdown formatting including any *.
    **Add** appropriate emojis in the post.
    Make sure only the **best 3** hastags are used.

    Provide the final version ready for posting.
    Output **only** the final LinkedIn-ready post without any introductory or explanatory text.
    **Do not** add links to any external resources.
    """,
    description = "Produces final LinkedIn post with guardrails.",
    output_key = "final_post",
    after_model_callback = final_draft_guardrail
)
Although we have specified that the model should follow the given instructions, it might not always do so, giving us inappropriate results.
To control agentic behaviour explicitly, ADK lets us define Callbacks that act as guardrails.
These are as follows:
Agent Lifecycle Callbacks
before_agent_callback: Runs before an agent starts, good for validation or logging entryafter_agent_callback: Runs after an agent ends, good for cleanup or modifying output
2. LLM Interaction Callbacks
before_model_callback: Runs before calling an LLM, useful for editing prompts or adding checksafter_model_callback: Runs after getting a response from LLM, useful for filtering or logging output
3. Tool Execution Callbacks
before_tool_callback: Runs before a tool is called, useful for input checks or blocking toolsafter_tool_callback: Runs after a tool finishes, useful for changing or logging tool output
In our example, we will set up the callback guardrail with the Final_Draft_Writing_Agent using the after_model_callback parameter.
The callback guardrail is defined as follows:
# Final draft guardrail

import re
import copy
from typing import Optional
from google.adk.agents.callback_context import CallbackContext
from google.adk.models import LlmResponse
from google.genai import types

def final_draft_guardrail(callback_context: CallbackContext, llm_response: LlmResponse) -> Optional[LlmResponse]:
    agent_name = callback_context.agent_name

    print(f"[Callback] Running guardrail for: {agent_name}")

    if not llm_response.content or not llm_response.content.parts:
        print("[Callback] No content found in LLM response.")
        return None

    part = llm_response.content.parts[0]

    if part.function_call or not part.text:
        print("[Callback] Skipping guardrail because response contains function call or no text.")
        return None

    original_text = part.text
    text = original_text
    modified = False

    # Remove markdown links like [text](url)
    new_text = re.sub(r'\[.*?\]\(.*?\)', '', text)

    if new_text != text:
        print("[Callback] Markdown links removed.")
        text = new_text
        modified = True

    # Remove raw URLs
    new_text = re.sub(r'https?://\S+|www\.\S+', '', text)

    if new_text != text:
        print("[Callback] Raw URLs removed.")
        text = new_text
        modified = True

    # Remove markdown formatting
    text_no_md = re.sub(r'\*\*(.*?)\*\*', r'\1', text)
    text_no_md = re.sub(r'__(.*?)__', r'\1', text_no_md)
    text_no_md = re.sub(r'\*(.*?)\*', r'\1', text_no_md)
    text_no_md = re.sub(r'_(.*?)_', r'\1', text_no_md)

    if text_no_md != text:
        print("[Callback] Markdown formatting removed.")
        text = text_no_md
        modified = True

    # Remove leftover [ ] brackets
    if '[' in text or ']' in text:
        text = text.replace('[', '').replace(']', '')
        print("[Callback] Square brackets removed.")
        modified = True

    # Replace markdown bullets with dashes
    bullet_converted = re.sub(r'^\s*\*\s+', '- ', text, flags=re.MULTILINE)

    if bullet_converted != text:
        print("[Callback] Markdown bullet points replaced with dashes.")
        text = bullet_converted
        modified = True

    # Remove intro phrases
    intro_patterns = [
        r'^\s*Here is.*?:\s*',
        r'^\s*Final draft.*?:\s*',
        r'^\s*Here\'s.*?:\s*',
        r'^\s*Your post.*?:\s*'
    ]

    for pattern in intro_patterns:
        new_text = re.sub(pattern, '', text, flags=re.IGNORECASE)

        if new_text != text:
            print(f"[Callback] Intro phrase removed using pattern: {pattern}")
            text = new_text
            modified = True

    # Extract hashtags
    hashtags = re.findall(r"#\w+", text)

    if hashtags:
        print(f"[Callback] Extracted hashtags: {hashtags}")
        modified = True

    if len(hashtags) > 3:
        print(f"[Callback] More than 3 hashtags found. Trimming to: {hashtags[:3]}")
        hashtags = hashtags[:3]

    hashtags = [tag.lower() for tag in hashtags]

    # Remove hashtags from main text
    cleaned_text = re.sub(r"#\S+", "", text)

    if cleaned_text != text:
        print("[Callback] Hashtags removed from main text.")
        text = cleaned_text
        modified = True

    if not modified:
        print("[Callback] No modifications made to the response text.")
        return None

    # Create final text
    final_text = (
        f"{text.strip()}\n\n"
        f"💡 Like this perspective? Follow Dr. Ashish Bamania to stay connected: https://www.linkedin.com/in/ashishbamania "
        f"{' '.join(hashtags)}"
    )

    print("[Callback] Final CTA and hashtags added.")

    modified_parts = [copy.deepcopy(part)]
    modified_parts[0].text = final_text.strip()

    new_response = LlmResponse(
        content=types.Content(role="model", parts=modified_parts),
        grounding_metadata=llm_response.grounding_metadata
    )

    print("[Callback] Guardrail applied successfully. Modified text returned.")

    return new_response
Create An Image Generation Agent
Given the final LinkedIn post, this agent will create an appropriate attention-grabbing visual.
We will use the DALL-E tool from CrewAI, and ADK gives us the CrewaiTool class to work with it.
The tool can be set up as follows:
!uv pip install "crewai[tools]" --prerelease=allow# Set up DALL-E image creation tool from CrewAI
from google.adk.tools.crewai_tool import CrewaiTool
from crewai_tools import DallETool
dalle_tool_instance = DallETool(model = "dall-e-3",
size = "1024x1024", # Create square image
quality = "hd", # Create HD image
n = 1) # Returns 1 image as a result
adk_dalle_tool = CrewaiTool(
name = "DALLE_Image_Creation_Tool",
description = "Generates images using DALL-E.",
tool = dalle_tool_instance,
)We need to set up the OpenAI API key to use this tool, which can be done in a similar way we did for the Google Gemini API key.
# Set up OpenAI API key

os.environ["OPENAI_API_KEY"] = userdata.get("OPENAI_API_KEY")
Let’s create an LlmAgent that uses this image generation tool.
# Image Generation Agent
image_generation_agent = LlmAgent(
    name = "Image_Generation_Agent",
    model = GEMINI_MODEL,
    instruction = """
    You are an Image Generation AI.
    Generate an beautiful, minimalistic and attention grabbing image for the context provided in the session state with the key 'final_post'.
    It should visually represent the key insights of the final LinkedIn post.
    This image will be posted with this LinkedIn post.
    **Please avoid** using any text in the image.
    Return the URL of the infographic image in your response.
    """,
    description = "Generates image using DALL-E.",
    tools = [adk_dalle_tool],
    output_key = "image_url"
)
Create A Sequential Workflow Agent
Let's finally set up a Sequential Workflow agent to orchestrate all the previously defined agents.
from google.adk.agents.sequential_agent import SequentialAgent

linkedin_content_creation_pipeline = SequentialAgent(
    name="LinkedIn_Content_Creation_Pipeline",
    sub_agents=[parallel_web_research_agent, writer_agent, seo_optimizer_agent, final_draft_writing_agent, image_generation_agent]
)
Set Up Session
ADK’s Session class represents the ongoing interaction/ conversation between the user and the agent system.
The data within the session is stored in its state and can be accessed using session.state.
For our agentic system, we will use the InMemorySessionService which stores all session data directly in the application’s memory.
You could use the DatabaseSessionService if you want to store session data persistently in a relational database, or VertexAiSessionService to use Google Cloud’s Vertex AI infrastructure for session management.
#Set up constants
APP_NAME = "linkedin_content_creation_app"
USER_ID = "ashish_bamania"
SESSION_ID = "content_session_01"
from google.adk.sessions import InMemorySessionService
# Set up Session
session_service = InMemorySessionService()
session = session_service.create_session(app_name=APP_NAME, user_id=USER_ID, session_id=SESSION_ID)Set Up Runner
ADK’s Runner class represents the orchestrator that manages the entire execution loop of the agent’s interactions/ conversations.
We can set it up as follows:
# Set up Runner
runner = Runner(agent=linkedin_content_creation_pipeline, app_name=APP_NAME, session_service=session_service)
Calling Our Multi-Agentic System
To execute our agent, we define a helper function called call_agent that:
Prepares user input as per ADK
Runs agents with the correct session context
Displays the final response
from google.genai import types

def call_agent(query):
    '''
    Helper function to call the agent with a query.
    '''
    content = types.Content(role='user', parts=[types.Part(text=query)])
    events = runner.run(user_id=USER_ID, session_id=SESSION_ID, new_message=content)

    for event in events:
        if event.is_final_response():
            author = event.author
            final_response = event.content.parts[0].text
            print(f"{author} Response:\n{final_response}\n")
Let’s test our agents now!
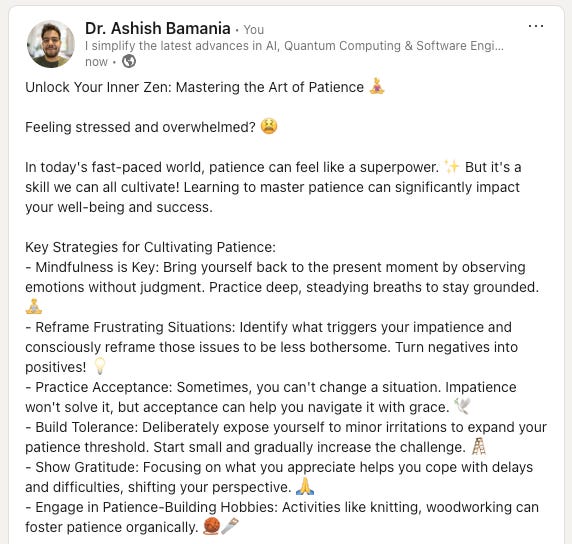
call_agent("How to master patience")Here’s the response from the final_draft_writing_agent that I have copied and posted on my LinkedIn profile without any modifications!
It’s super amazing!

Congratulations on building your multi-AI agentic system for LinkedIn content creation using Google ADK!
Further Reading
Notebook for the code used in this tutorial (Give this repository a star if you loved the tutorial)
Source Of Images
All images, including the screenshots used in the article, are created by the author unless specified otherwise.
